Showing posts with label DIY. Show all posts

Tuesday, August 28, 2012

Homemade Laundry Detergent - Is it worth it?

It seems lately that a lot of moms are switching to making their own homemade laundry soap. I've been getting tired of spending a ton of money on safe, ECO-friendly laundry detergents, so I thought I would give it a try. I started out using the basic recipe I found on most sites.
  • 1 cup borax
  • 1 cup washing soda
  • 1 bar Fels-Naptha laundry soap

So I began by grating the Fels-Naptha. About halfway through I started to wonder about the decision to use this product since the smell was so overpowering. It occurred to me that I hadn't checked the label on the back of the soap. Why? I don't know. I always check labels. I guess my initial feeling was that this was supposed to be natural and safer so I didn't need to worry about it. After checking the label, I realized how misguided this thought was.

This is how it reads: 
Ingredients: Cleaners, soil and stain removers, chelating agents, colorants, perfume

I hate it when companies do this. I think I have a right to know what is in a cleaning product. It doesn't help me feel better when I read the caution right below the ingredients which read:

Caution: Eye and Skin Irritant. Avoid contact with eyes and prolonged contact with skin.

So It was at this point I decided to do some investigating. I found the actual list of ingredients on the Fels-Naptha web site. Here they are: 


Soap (sodium tallowate*, sodium cocoate* (or) sodium palmate kernelate*, and sodium palmate*), water, talc, cocnut acid*, palm acid*, tallow acid*, PEG-6 methyl ether, glycerin, sorbitol, sodium chloride, pentasodium pentetate and/or tetrasodium etidronate, titatium dioxide, fragrance, Acid Orange (CI 20170), Acid yellow 73 (ci43350) 

Since I can't tell you what any of those ingredients are, I had to do some more searching.  What I found was that a number of these ingredients are questionable, and they most definitely are not natural. (Although arsenic is natural so maybe that shouldn't be a litmus test for health) For example: Titatium dioxide is a known contaminate and is harmful to wildlife, Acid yellow 73 is banned for use in cosmetics and show to be potentially unsafe in a number of studies, and PEG-6 methyl ether is a skin irritant and there is a small amount of evidence that it may be linked to organ toxicity.

Overall, it's not so bad, but my feeling is if I'm going to go to all this trouble to make my own laundry soap, then I should feel like it's safe for my family. So I decided to toss the Fels-Naptha and purchased some castile bar soap. I got Dr. Bronner's All in One Hemp Rose Castile Soap. It smells so good! So I grated it up and combined it with the other two ingredients. I used it in my wash a few times but it only worked okay to be honest. A lot of my clothes were coming out stained and I didn't feel like they were getting as clean as I would like. One plus.. my clothes came out much softer.

Not to mention, I was a bit put off by using borax. I have avoided it for a long time because I am concerned about it being slightly toxic. It was one of the main reasons I took so long to make my own laundry soap. I use hydrogen peroxide in my all purpose cleaner instead of borax. I have tried many times over to research borax, but have found much of the information out there to be contradictory so to be on the safe side, I decided to look into ways of making laundry soap without it.

Most of what I found was simply the same recipe as above without the borax. So I thought I would give it a try, but as I was mixing my ingredients, on a whim, I decided to check the directions for using the washer soda. To my surprise, it said to add 1/2 a cup to loads to increase the effectiveness of your detergent. 1/2 a cup! I was using about a tablespoon a load. No wonder it didn't work well. So I adjusted my recipe as follows:
  • 1 bar Castile soap
  • 7 cups washing soda
At about a  half cup a load, that equaled 16 loads. It worked much better, except my clothes weren't as soft so I gave in and added a cup of borax to the mix to make it:
  • 1 bar Castile soap
  • 7 cups washing soda or a whole 55oz box
  • 1 cup borax
That helped, though my clothes still weren't as soft as before. They were definitely coming out much cleaner though. 

So here is my issue.... was it worth it? Did I save any money on this venture or am I better off going back to the ECO detergents?

So I did the math.

My laundry soap cost $3.59 for the soap, $3.29 for the box of washer soda and 4.79 for box of the borax which I used approximately $.50 worth.  If I use the full 1/2 cup per load this comes out to... (drum roll)

Grand total: $7.38 or $.41 a load 

Per load, this is how it compared to the Eco friendly detergents:
  • 7th Generation liquid  $16.00 for 66 loads or $.24 a load
  • 7th Generation powder $15.00 for 70 loads or $.21 a load
  • Method $15.50 for 50 loads or $.31 a load
  • and Meyers $16.00 for 64 loads or $.25 a load

Wow! That's a big difference! Of course, most of us realize the number of loads represented on a box is usually inflated, listing the amounts or a "regular" or medium size load when I'm referring to a large load, but even so it's a big difference. From what I can tell both financially and time-wise, it just doesn't make any sense to make your own soap. Now, if you are dealing with allergies or just want to be absolutely sure of what's in your soap, then this could be a good alternative.

But for me, it just makes better sense to buy.


Next investigation... which laundry detergent works best! :)

Monday, August 20, 2012

Getting Organized - Children's Toys

I think I can! I think I can! I think I can!

So as I might have mentioned once or twice before, I'm a slob. And not a happy one either. I hate my house being such a disorganized mess. It drives me crazy! I said I was going to take this summer to get my act together now that I wasn't working and had more time. Didn't happen. I got sidetracked will a million other things and quit before I even got started. But on my trip a few weeks ago to visit family in Miami, I had an inspiration... my sister in law. She has two kids, two jobs, and the nicest most organized home I've ever seen. No, she did not clean it up for our visit. She actually keeps it that way ALL OF THE TIME!

She admitted to me that she was a bit OCD, but unfortunately for me, that is one disease that isn't contagious so almost immediately after our arrival back in town, my house returned to its usual trashed-like state. I wanted to pull my hair out! Luckily, I had the image of my sweet sister in my mind reminding me that it is possible. My house can be clean. So now, I am a woman on a mission, and unlike my mission to lose weight this is a real mission that I will complete or die trying. (Okay. Maybe that was a bit overdramatic). I will organize my house! Who's with me?

First off, the one part of the house, I started, but never got around to finishing... the playroom.

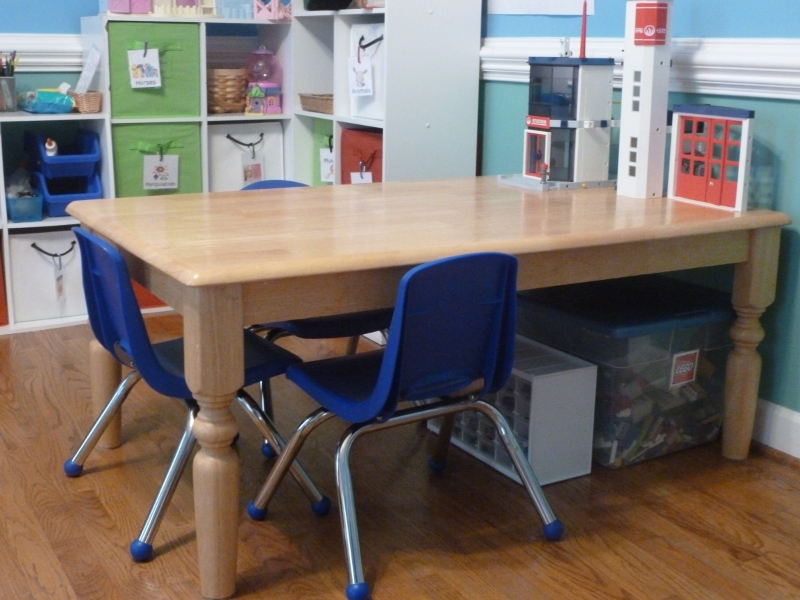
This playroom actually started out as a home preschool that I ran for a couple years. I closed it this spring, and turned it into my kids playroom. I have a few things in here that I think were pretty cool ideas that I'd like to share.


First off, is the reading area. As you might have noticed, this "couch" is actually a toddler bed, purchased at a garage sale. I got the mattress on craigslist. I'm not typically a fan of used mattresses, but they aren't sleeping on it so I'm not so worried. It's really nice because I can cover it with a mattress pad and sheet, and wash them easily when they get dirty. Underneath the couch are book bins - labeled with pictures so my daughter knows where the books go. I'd prefer a bookcase, but simply didn't have the space for it.

Next you'll see my block area. It's actually a really old entertainment center, but works great for the blocks. Old entertainment centers are wonderful for storing kids toys. They are sturdy and have deep shelves which are usually a good fit for plastic bins. They are also low to the ground and don't pose a tipping hazard. Best of all, since no one uses big heavy TV's anymore, you can often find these for really cheap at garage sales or goodwill.


Beside the blocks is our easel. I purchased it for $35.00 at A.C. Moore with a half off coupon. Moving on...


On the opposite end of the room I have a ridiculous amount of dress up clothes (remember, I ran a preschool).  To avoid having to drill hooks into the wall, I just used Command wall hangers to hang the clothes on and a crate to hold the larger items in. I also have a three drawer bin, to hold all of the little things like tiaras and dress-up shoes.


Our art table was, if I do say so myself, as stroke or genius or maybe just common sense. Either way, it's awesome! All I did was take a wooden kitchen table I purchased on Craigslist and have the legs cut down at Home Depot (for free :) ).


Above the table, I placed thin rectangles of cork board along the wall to hang the children's art from.

Last but not least, is my wall of cubbies. I already had the wooden cases from my school, as well as a few of the boxes. Then I spent the next couple of weeks hoarding A.C. Moore coupons (see a trend here) and purchasing them one at a time to save money. I even went so far as to have my 6 year old buy a few with coupons so I wouldn't have to make multiple trips. (Hey, it says one coupon per customer. There were no stipulations about the customer's age). The challenge with these cubbies is that they are, obviously, not transparent so the kids can't see what's in them, and labels don't stick well to the canvas coverings. My solution was to make labels and hang them from the box handles with tiny climbing hooks. I got them two for a dollar at Walmart.

How do I make labels? Well, I'm so glad you asked. This is what I do:

I make them in word.

First I choose a simple font, like Veranda or Times, and make a list of all the descriptions I want to use to label my bins. These are going to be different for everyone depending on your child's interests, but just to give you an idea of what I'm talking about, here are the ones I made: Art, Coloring books, Play dough, Horses, Action Figures, Barbies, Cars, Stamps, Dress-up, Instruments, Books, Legos, Animals and Dolls. Next, I googled images to match my descriptions, and saved the pictures I liked into their own file. (You can just use clip art, but I've found much nicer images through Google). Then, I divided my document into two columns (to save paper) and inserted the pictures beneath the descriptions.  I then printed, cut and laminated all of my labels. I have have a lamination machine, but you can get yours laminated at any copy store.


Depending on the size of your bins and the kinds of bins you use, these labels will need to be printed differently. If you're using typical plastic bins, you can just size your labels to fit, print, cut and laminate them before taping them to your bins. If you have canvas bins like mine, you will want to leave extra space at the top of each label. Once you print them, you will need to cut the labels out leaving that extra room at the top for you to punch a hole into. After you laminate and cut out the final labels, you can punch that same hole again, thread the clamps through them, and hang them on their corresponding bins. Here's how one of my final ones looked.


It was a little time consuming, but I think it will totally be worth it in the long run.  At least the kids can't claim they don't know where things go anymore, which I hope will reduce the amount of junk they leave strewn all over the house. Best of all, their playroom looks super cute!


If you have any questions or ideas to share, please leave me a message in the comments below. I will do my best to address them as quickly as possible.

Monday, July 16, 2012

DIY - Montessori Dressing Boards

I am obsessed with Montessori. Not the woman, the toys! (i.e. learning materials). This stuff is so brilliant, but it is also super expensive. Fortunately, a lot of the materials aren't that hard to make with a little ingenuity and some elbow grease. One of my favorite diy Montessori Materials are the dressing boards. Dressing boards are a great way for little ones to work on their hand-eye coordination skills. They're usually for children around 2 and up who are learning to dress themselves, but my daughter was playing with the zipper frame at 13 months old .

These are pretty expensive new, and really easy to make, so it just makes sense to do it yourself. Dollar store wooden frames work great! I used one of my daughters old sweaters, but the other two I got for really cheap at a consignment store.

What you'll need:
  • 5X7 wood frames
  • Needle nose pliers
  • Infant clothing - 3 or 6 months - with zippers, buttons and/or snaps
  • Chip clips or clothespins
  • Staple gun and staples (approx 1/4 inch)

Directions:
  1. Remove the glass and backing from the frames.
  2. Using the pliers, carefully remove the metal tabs from the frames.
  3. Fit the clothing over the frames and lay them button side down.
  4. Bunch up the excess clothing in the back, and secure it with chip clips or clothes pins. (Don't pull to tight or the buttons will be difficult to manipulate)
  5. Staple the clothing onto the frame leaving at least and 1 to 1 1/2 inches between staples.
  6. Remove the chip clips and fold the excess material so it lays flat. Staple it to the frame using the spaces between the first set of staples.


Here are the ones I made. There is a button frame, zipper frame, and snap frame. Next I need to figure out how to make a lacing frame. They just don't seem to make bustiers for infants. ;)


Share the love!!

Linkwithin

Related Posts Plugin for WordPress, Blogger...